

IPS BATS Setup Procedure
Equipment
1. ORE BATS USBL
1.1. Deck cable (10 m)
1.2. Hydrophone (Model 4213C 22-30 kHz)
1.3. Ethernet switch
2. ORE Trackman software version 1.0.14.0 or later.
3. IPS software version 7 or higher & IPS USB security key.
PC Software Setup
1. Install ORE TrackMan software and update if required.
2. Verify that data output format is set correctly using the text editor Notepad.
2.1. C:\Program Files\ORE Offshore\Trackpoint MMI
2.2. Files: SENT_OUT.INI and SENT_TPI.INI
[PORE]
FormatMask=3
StartOfMsg=$
Format=PORE
Delimiters=,*
PositionMask1=0
PositionMask2=0
PositionMask3=0
Types=cxtxaxxxxxxxx
NMEA_Format=I02I,U002,c032,i01s,b032,XM62,YM62,DM51,R032,P032,E02I,Q02I
[POREG]
FormatMask=3
StartOfMsg=$
Format=POREG
Delimiters=,*
PositionMask1=0
PositionMask2=0
PositionMask3=0
Types=cxtxxxxxxxxxxxxxx
NMEA_Format=I02I,U002,104I,204I,304I,Q02I,E02I,SM52,A022,B032,XM62,YM62,DM52,C032,P032,R032,tC3I,G031
3. Power on BATS (front rocker switch)
(The order of the software start-up is important for supporting the TCP Server)
5. Launch IPS from desktop icon 
6. Verify that an IPS security key was found, there should be a valid serial number on the startup screen or in the about box under the help menu.
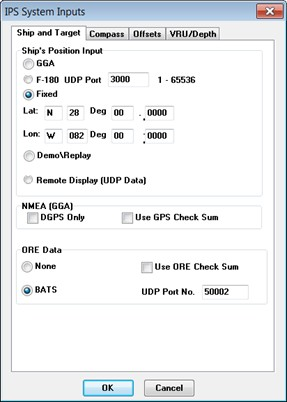
7. Open the IPS Inputs Menu->System Input->Ship and Target dialog box and select the BATS radio button in the ORE data group box. The IPS software will automatically start receiving data via UDP broadcast from TM (port 50002) and also start using the ORE time tag. Then select the required GGA input from the Ship's Position Input group box.
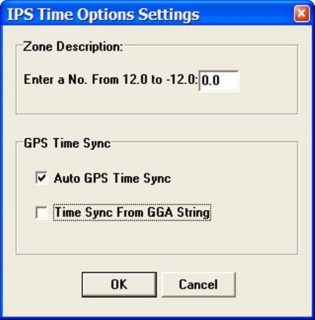
9. If only receiving GGA NMEA formatted strings, check “Time Sync From GGA String” and be sure that the PC date and time zone are set correctly.
Note: Click [Apply] for each section
Note: If using $POREG output from Trackman all offsets must be set in the IPS (Appendix A).
Support Vessel (CRP = Center of Roll/Pitch of the support vessel)
• Ship: LOA and Beam
• GPS: GPS X,Y,Z location with respect to CRP
• Reference: Ref X (+ to Stbd of CRP), Ref Y (+ fwd of CRP, towards the Bowl)
• Hydrophone (Warning Only set the Hydrophone offsets in one location, either in IPS or in Trackman but not in both):
o Hx (+to Stbd of CRP), Hy (+ Fwd of CRP), Hz = (+below CRP)
o Hydrophone heading, roll, pitch bias = 0 (before calibration)
• Ctr Roll Pitch: Center of Roll/Pitch X,Y,Z
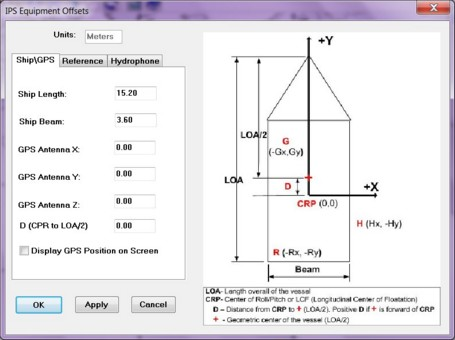
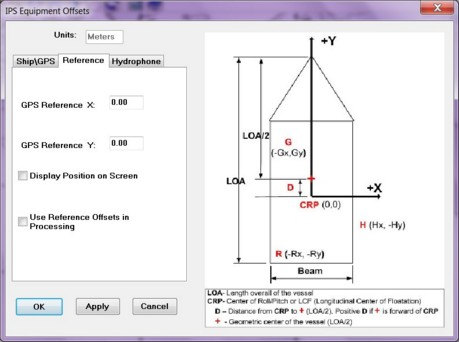
Example of the GPS and Reference Offsets Pages
12. Verify that valid ship (GPS) data is being collected and displayed.
13. Verify that the Firewall is disabled or the PC has access to TrackMan IP/port (50002).
14. Launch the TrackMan (TM) from the desktop or Windows Start->main menu. 
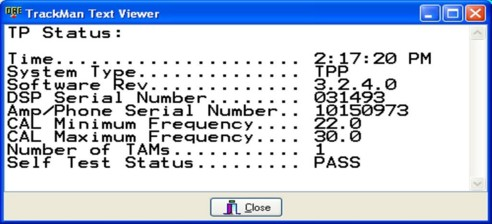
15. The BATS status window should be displayed, indicating that the system boot-up is good, click [close].
Note: the S/N on the hydrophone and filter board should match the number displayed in the status window.
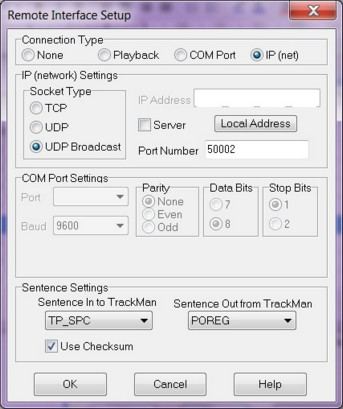
16. On the TrackMan, Select “Device List”
ü Double click on Remote Interface row 7 (figure 2). 50002 for port number broadcast

ü Toggle the “Use Checksum”, this actually enables the port for USBL pass through commands (Output format $PORG). UDP Broadcast
Set Beacons see Trackman software